

How To Prepare A Bonsai Pot For Planting
Repotting can be a fast paced time for those with larger collections, Being able to efficiently prepare a bonsai pot for the tree can save you some valuable time. You don’t want to skip past any steps either as things like correctly placing your mesh and making sure your anchors wires are applied correctly can avoid major issues later on. So lets take a look at how to properly prepare a bonsai pot for planting.
Step 1 Gathering Your Materials
This is a big one, it might seem like something small and also seems like something that has nothing to do with actually preparing the pot itself but if you don’t have the supplies you cant even start the work. The reason this is importing is because we usually have a small window of opportunity for repotting at an optimal time where the tree will suffer minimal damage and downtime. You don’t want to miss that window because you are waiting on supplies to arrive.
So what supplies will you need?
A Bonsai Pot : Seems obvious but ill say it anyway, before repotting season comes you need to look at your trees and tag them with a tree label so you know what trees will need repotting this coming season. Once you know what trees need doing you can then either figure out if you need a new pot or if you'll be just repotting the tree back into its existing pot, if you need a new one then you can begin looking for the right bonsai pot. You'll want to start looking early as it might take some time to source the bonsai pot that is right for your tree, once you find it you can purchase it and have it sitting on the tree ready to go as soon as the tree gives you the signs its ready for repotting.
Potting Mesh : Have your potting mesh handy and ready to go, make sure you have enough to cover all the trees that need potting up or repotting as you don’t want to run out half way through. The potting mesh we sell is designed especially for bonsai, its holes are small enough that soil doesn’t fall through and prevents bugs from entering your soil system but large enough that it still allows free drainage and airflow into the pot. It is also easily torn from the sheets and can be re used over and over again.
Bonsai Wire : You will want to make sure you have the correct size aluminium bonsai wire to anchor your tree back into the pot, We always suggest aluminium because it can stretch. The reason this is important is because if you forget about the wire in your root ball and the root ball grows the wire will stretch and break, if you use a stronger wire like copper or steel as the root ball grows the wire wont stretch and break. The pot now becomes the weak point and that what will break.
Wire Cutters : When working with wire its always handy to have your wire cutters on hand to easily cut the wire you are working with.
Jin Pliers : These wont be necessary for preparing the pot but chances are if your preparing a pot your just about to drop a tree in it. In this case you will need a good set of jin pliers to tighten down the anchor wires around the root ball.
Step 2 Adding Drainage Mesh
Bonsai pots have large drainage holes in them and if they aren’t covered with drainage mesh your new soil will fall through and this leaves a big opening for pests to get into your root system, Don’t use anything that is restrictive such as fly screen, you also don’t want to use anything that is too large as it will defeat the purpose.
So lets look at adding some mesh to a bonsai pot

1 : roughly measure the holes you will be covering and tear off some mesh that will cover that hole and some, you want at least 1 extra row of mesh on each side of the hole to make sure it doesn’t pull through when you apply your wire.

2 : apply some wire through the mesh to hold it in the pot, there are 2 methods for this, the U technique or the Butterfly technique.


I personally use the U technique as its fast, but when using the U technique you need to make sure that you make the horizontal plane of the U pretty much the same width as the hole, if you do it too narrow it will pull up the edges of the mesh as you pull the wire through.
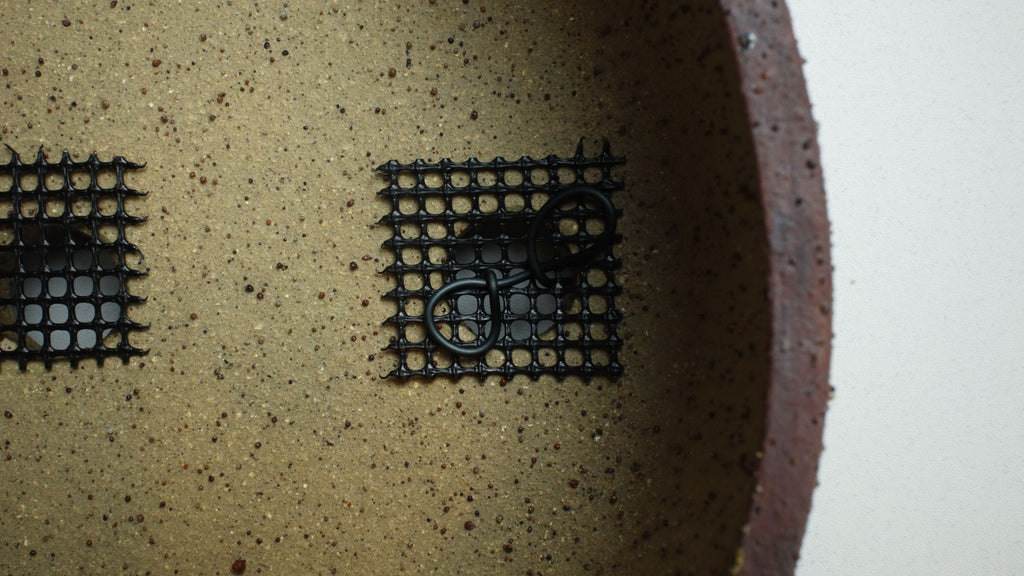
With the butterfly method the “ Butterfly “ section will hold the mesh down evenly.

Underneath the pot you will want to spread the wire across and leave enough wire that it has a good purchase on the bottom of the pot.
Step 3 Adding Your Tree Anchor Wires
This is a step not to be skipped, once a tree has had its roots cut it will need some support to stay in the pot. Not only this but the trees root system will need to stay perfectly still as there will be new fleshy roots growing, if the tree rocks about the new roots can easily tear which will set the tree back. If this continues to happen every time the tree grows new roots it could eventually get weak or die.
A Pot With Anchor Wire Holes
These pots are the easiest to work with as there a proper holes put around the pot to add the anchors too. Depending on your tree you may use some of them or all of them, Either way the process is the same.

You will want to measure out some wire leaving enough length that you can get it over the root ball and tie it down, for people with a bit more experience they would likely add chopsticks to the root ball and tie down to them but we wont go over that as if you are using that technique you likely don’t need this article.

Once you have measure out your wire make some 90 degree bends in line with the holes so the wire threads through and seats perfectly.
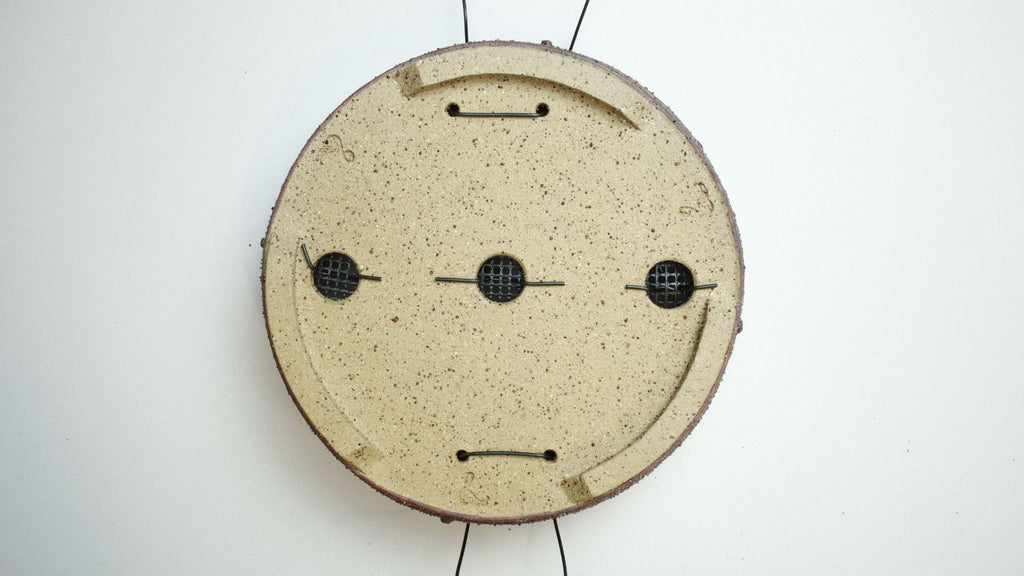

Now you can thread your wire through and bend it over the top lip of the pot so it stays in place while you work on getting your tree into the pot.
Your anchor wires are now placed.
A Pot With 2 Drainage Holes But No Anchor Wire Holes
Some pots will have just 2 drainage holes and no anchor holes so you will have to employ a slightly different technique. For this pot you will want to do the following

Measure 2 lengths of wire leaving enough length that you can get it over the root ball and tie it down like mention in the method above.

The same as the method above as well you can make some 90 degree bends in line with the holes so the wire threads through and seats perfectly


Now you can thread your wire through the holes with 1 set of wires going to the back and one set of wire going to the front. Once the root ball is in the pot this will give you a set of wires either side of the root ball to tie it down.
A Pot With A Single Drainage Hole
Some pots may only have 1 single drainage hole so you have to get a little bit more creative here.

Follow all the same steps as above, except now instead of bending your wire 90 degrees to suit the hole width you will want to cut a short length of thicker wire. This thicker wire will need to be thick enough that it will be able to handle some tension but not so thick that it will hold the pot up off the table when the pot is sat flat.

With you small length of thick wire you can now wrap your smaller wire around it twice


( Lets Pretend This Pot Doesn't Have Anchor Holes )
Once the smaller wire is wrapped around you can thread it through the hole like normal and the thicker wire will catch on the underside of the pot allowing you to tie the wire down like normal.
Conclusion
That is pretty much it for preparing a bonsai pot for planting, there are some other pot types such as a pot with 3 drainage holes which is seen in some round pots but you can employ the techniques of the 3 basic ones taught about with most other pots. There is also a more advanced technique for creating forest plantings but once again if you are at that level you probably don’t need me showing you my techniques for preparing a bonsai pot.
I hope this has helped and happy potting!